When I teach protein structure in introductory biology, I like to show the dramatic shape changes that can occur when proteins bind ions. My protein of choice for these demonstrations is calmodulin, which undergoes a large conformational change upon binding calcium ions. I recently found the Climber program, which can calculate the structural changes necessary to morph one protein conformation into another using the structure files from the RCSB Protein Data Bank. When combined with PyMOL, the output looks absolutely stunning.
CaM-conf-vimeo1 from David Oppenheimer on Vimeo.
What I like about the Climber program is that it uses energy minimization in calculating the shape changes rather than only linear interpolation. Using energy minimization means that the resulting conformational change is likely to be closer to what really happens when the protein changes shape. Here is how I created a movie of calmodulin morphing from the “closed” state (without calcium ions) to the “open” state (with bound calcium ions).
Get two PDB files to morph
Go to the RCSB protein database and search for calmodulin in the X-ray structures. There are about a zillion calmodulin-related structures, so after a bit of filtering and searching I found the following structures:
1QX5, the crystal structure of apoCalmodulin (without bound calcium) from Rattus norvegicus
3CLN, the structure of calmodulin with bound calcium from Rattus rattus
Get the Climber software
The Climber1 program uses energy minimization in calculating the shape changes rather than only linear interpolation. Using energy minimization means that the resulting movie is likely to be closer to what really happens when the protein changes shape.
Note: The steps below were taken from the README.txt file that is downloaded with the software. I just changed the filenames, directory names, etc. for this example.
Go to the SimTK website, and create an account. Then login to your account and go to the Climber download page and download the software appropriate for your system.
Create a working directory for Climber.
$ cd ~
$ mkdir climber-work
Move the downloaded file into the climber working directory, and unpack it.
$ mv ~/Downloads/Climber_v1.0_2011_Mac.tar ~/climber-work/
$ cd ~/climber-work
$ tar xzvf Climber_v1.0_2011_Mac.tar
Set the environment variable CLIMBERDIR.
$ export CLIMBERDIR=~/climber-work/Climber
Let’s try it. First I’ll make a test directory, then I’ll download the pdb files into the test directory.
$ cd ~/climber-work
$ mkdir test03
$ cd test03
$ curl -o 1QX5_orig.pdb http://www.rcsb.org/pdb/files/1QX5.pdb
$ curl -o 3CLN_orig.pdb http://www.rcsb.org/pdb/files/3CLN.pdb
Create an alignment.
$ awk '/ATOM/ {print}' < 1QX5_orig.pdb > 1QX5.pdb
$ awk '/ATOM/ {print}' < 3CLN_orig.pdb > 3CLN.pdb
$ ${CLIMBERDIR}/sh/rms.sh 1QX5 3CLN > morphx.al1
Morph 50 steps. Note: This step can take a while depending on how many steps you chose. On my laptop with 50 steps, it took less than 10 minutes.
$ ${CLIMBERDIR}/sh/morphx.sh 1QX5 3CLN 50
A new directory 1QX5_3CLN_050step was created. This directory contains all the .pdb files for the trajectory.
Import the files into PyMOL
Start PyMOL.
$ cd ~
$ pymol
Load the trajectory files into PyMOL.
> cd ~/climber-work/test03/1QX5_3CLN_050step # path/to/your/pdb-files
> for idx in range(0,48):cmd.load("file%05d.pdb"%idx,"mov")
The first command changes directories so that PyMOL can find the pdb files created by climber. The second command loads those files into PyMOL as a movie. The range(0,48) corresponds to the number of pdb files in the directory. The output files from climber are numbered from 0 to 47 (48 files), but PyMOL does not want to use 0 as the first state. Setting the range to be range(0,48) results in all 48 files being loaded. The "file%05d.pdb" tells PyMOL that the pdb files have a prefix of file followed by a 5-digit number, %05d, and the extension, .pdb.
If you are successful, you should have a multi-state file loaded with the name of mov.
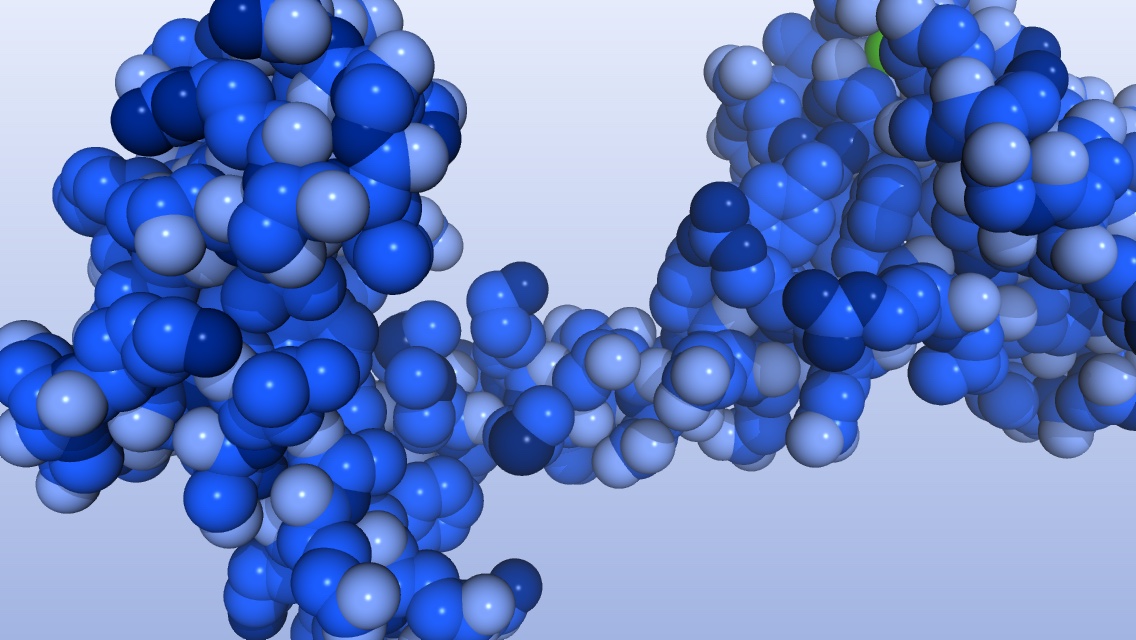
Make the protein look pretty
I want to use a blue color palette for my protein this time. I found a good html color picker online on the Paletton.com website. Just click on the blue area in the outside circle and you get a nice palette of compatible shades. Here is my blue palette:
# set some new colors

# lightestblue2 RGB: 173, 197, 255
set_color lightestblue2= [0.678, 0.769, 1.00]

# lightblue2 RGB: 127, 164, 255
set_color lightblue2= [0.498, 0.643, 1.00]

# medblue2 RGB: 27, 92, 255
set_color medblue2= [0.106, 0.361, 1.00]

# blue2 RGB: 0, 42, 146
set_color blue2= [0.0, 0.165, 0.573]

# darkblue2 RGB: 0, 32, 112
set_color darkblue2= [0.0, 0.125, 0.439]

# lightpalepastel1 RGB: 229, 235, 251
set_color lightpalepastel1= [0.898, 0.922, 0.984]

# darkpalepastel1 RGB: 162, 180, 226
set_color darkpalepastel1= [0.635, 0.706, 0.886]
Adjust the viewport.
> viewport 640, 640 # These settings are for Instagram
Color the background with a gradient.
> set bg_gradient
> set bg_rgb_top, lightpalepastel1
> set bg_rgb_bottom, darkpalepastel1
Color the molecule.
> color lightestblue2, elem H and mov
> color medblue2, elem C and mov
> color lightblue2, elem O and mov
> color darkblue2, elem S and mov
> color blue2, elem N and mov
Adjust lighting to make the molecule look shiny.
> set specular, 0.25
> set spec_power, 300
> set spec_reflect, 0.5
> util.ray_shadows("light")
> set antialias, 1
> set orthoscopic, off
> set field_of_view, 30
Position the molecule.
> set_view (\
     0.521059155,    0.795044482,    0.310482085,\
     0.852752090,   -0.469526380,   -0.228807062,\
    -0.036128242,    0.383986622,   -0.922630191,\
    -0.000437868,    0.000204675, -127.810752869,\
    31.476222992,   50.789539337,  -21.699123383,\
   -52.606685638,  308.208343506,  -30.000000000 )
Make a movie in PyMOL that loops back and forth
> mclear
> mset 1 -48 -2
> set cache_frames=0
> set ray_trace_frames=1
> cd ~/pymol-work/1-pymol-movies/CaM-conformation
> mpng CaM-conf-mov
The mclear command tells PyMOL to remove any saved frames from the cache.
The mset command tells PyMOL which states get included as frames of a movie. In our case, frames 1, 2, 3, …, 47, 48, then 47, 46, …, 4, 3, 2. Stopping at state 2 allows smooth motion when we loop the resulting exported movie.
The set cache_frames=0 command tells PyMOL to not save each frame in memory. If the frame cache is turned on, a large amount of memory is used saving the images in RAM.
The mpng command will write each frame of the movie to a separate file with the specified prefix, in this case, CaM-conf-mov.
To test the movie, turn off ray tracing of frames: paste set ray_trace_frames=0 into the PyMOL command line. When you are ready to create the frames of the movie, turn ray tracing back on: set ray_trace_frames=1.
Note: Since I don’t pay for a PyMOL subscription, I have to compile the code myself. The open source version of PyMOL does not have the movie creating commands, so I have to create png files for each frame, and then put them together using other software.
Make the movie from the .png files
I have previously installed the free command line video tool, FFMPEG. There is definitely a learning curve when using ffmpeg, but luckily, there are lots of tutorials on the web for your learning enjoyment. Here are the options I used to make the movie at the start of this post. I got the explanations from the Joy of Data blog and the ffmpeg manual.
ffmpeg
  -framerate 30     # input frame rate
  -i image%03d.png  # image names (image000.png, ..., image999.png)
  -s:v 640x640      # video size
  -c:v libx264      # encoder
  -profile:v main   # H.264 profile for video
  -crf 12           # constant rate factor (0 to 51, 0 is lossless)
  -pix_fmt yuv420p  # pixel format; changes the rgb from the pngs to yuv
  -preset veryslow  # encoding speed (slow but higher quality per file size)
  -tune stillimage  # tunes the encoding settings for images
  -r 30             # output frame rate
  output_file.mp4   # movie file name
Type the following on the command line.
$ cd ~/pymol-work/1-pymol-movies/CaM-conformation
$ ffmpeg -framerate 30 -pattern_type glob -i '*.png' -s:v 640x640 -c:v libx264 -profile:v main -crf 12 -tune stillimage -pix_fmt yuv420p -preset veryslow -r 30 CaM-conf02.mp4
Success! We have a movie that loops nicely, and that I can post to Instagram. Note: To view the movie, I use VLC from the VideoLAN website as my movie player.
Optimize the video for Vimeo
ffmpeg
  -framerate 30        # input frame rate
  -i image%03d.png     # image names (image000.png, ..., image999.png)
  -s:v 1280x720        # video size
  -c:v libx264         # encoder
  -crf 18              # constant rate factor (0 to 51, 0 is lossless)
  -pix_fmt yuv420p     # pixel format; changes the rgb from the pngs to yuv
  -preset veryslow     # encoding speed (slow but higher quality per file size)
  -tune stillimage     # tunes the encoding settings for images
  -r 30                # output frame rate
  output_file.mp4      # movie file name
To post on the Cell Bones website, I want to optimize the video for Vimeo. Mainly this means changing the image dimensions and moving the moov atom. I also used a higher antialias value in PyMOL so that the images look sharper. So, briefly, start PyMOL, import session, change viewport to 1280x720, color and reposition protein, turn on ray tracing, set antialias to 2, make the movie, and export frames to png files.
$ cd  ~/pymol-work/1-pymol-movies/CaM-conf-vimeo
$ ffmpeg -framerate 30 -pattern_type glob -i '*.png' -s:v 1280x720 -c:v libx264 -crf 18 -tune stillimage -pix_fmt yuv420p -preset veryslow -r 30 CaM-conf-vimeo1.mp4
-
Weiss D.R., and M. Levitt. 2009. Can morphing methods predict intermediate structures. J Mol Biol. 385: 665-674. full text of publication ↩